Thursday, 25 November 2010

Exercise 3 - Histograms Digital Photographic Practice.


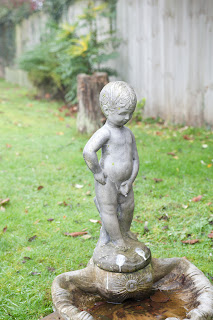
Photograph taken in average contrast conditions with a low winter sun coming from the right of the photograph.

Histogram shows a spike to the left indicating blocked shadows. Examination of the image using the Camera Raw conversion (CRc) programme shows that the affected areas are the top left and top right corners of the image. Neither are in critical areas of the image and would probably be cropped out in any finished image.


Same contrast conditions as the preceding image but exposure 1 stop higher.

Histogram shows a good distribution of pixels across the graph and there are no blocked shadows. Although not immediately evident on the histogram examination of the image using CRc reveals some blown highlights on the statue. 


Contrast conditions the same as previous two photographs but exposure 1 stop lower.

Histogram shows pixels predominantly to the left indicating that the image is underexposed. Spike on left suggests blocked shadows as would be expected given the exposure time. Again the CRc reveals that that in addition to those revealed in the first image there are some in the grassed area in front of the statue and in the flower bed near to the head. The shadow between the statue's legs is also blocked. 

The first three images were taken using automatic exposure bracketing so the lighting conditions are the same for each.


The next three images were taken in low contrast conditions (overcast day) using automatic exposure bracketing.


The first image was taken at 1/125th of a second. The histogram shows a good spread of pixels across the graph indicating a good tonal range. There are no problems with blocked shadows or blown highlights.


Exposure increased by 1 stop.

Marked shift to the right less tonal range as can be seen by comparing the two images. There is a limited amount of blown highlights.


Exposure decreased by 1 stop.

Histogram shows significant shift to the left indicating under exposure and limited tonal range. The are no highlights that extend to the right hand side of the graph. Some blocked out shadows. Examination of the image in CRc shows that these are in the water immediately under the statue.

The next three photographs were taken using off camera flash. The flash unit was fitted with a snoot to provide a concentrated area of light and was placed to the left of the statue at an angle of about 30 degrees. The images were taken separately rather than using AEB but the lighting remained constant because of the use of flash. 


The first image was taken at 1/125th of a second. The histogram is almost flat but there are both blocked shadows and blown highlights. The blocked shadows are very limited and relate to the very dark shadow  immediately under the statue. There are considerable blown highlights. All the sky at the top of the image is blown out and from head to knee on the left side of the statue.


This image was taken with the exposure increased by one stop. As can be seen there has been a shift to the right and further examination reveals that there are large areas of blown highlights particularly the statue and the sky. Would need a lot of work to improve. Would reject in camera normally.


Histogram suggests good tonal range. There are blocked shadows as can be seen from the spike on the left of the histogram but further examination shows them to be in insignificant areas. There are also some  blown highlights but could be easily rectified.

General conclusions  - Using the camera histogram offers the opportunity to make judgements of the quality of the photograph almost immediately after the shot is taken by referring to the display on the camera's LCD.  It also provides an opportunity to check the camera settings chosen to see if they need some re-setting.

However it does have limitations and care needs to be taken that images are not discarded solely because there is something 'odd' about the histogram. Personally I wait until I have transferred them to the computer and opened them in Camera RAW because the amount of information is so much greater. Furthermore you are able to try out various adjustments that may produce an acceptable or on occasions a very good image. 

The ability to combine images in Photoshop e.g. HDR software also should be taken into account before discarding images that have been taken under the same conditions of lighting.


Monday, 22 November 2010

Exercise 1 DPP Workflow - Completion

Objective
Portrait Shoot in one session.

Location
I chose to take the portrait shots of my wife in our own home. Although I considered outdoors the uncertain weather with predominantly cloudy skies meant that I could not be certain of reasonable light on the day.


Lighting
I decided to use off camera flash. In part this was because I had more control of the light but also I saw it as an opportunity to practice this method in an actual shoot.

Camera
I used a Canon 5D MkII. I started out using the 24-70mm lens which is wide angle but found that this provided too much extraneous background.  I switched to the 70-300mm lens at or around the 70mm mark and found that this gave me much more control over the initial composition. As I was using flash I set the shutter speed to 1/125 and kept an aperture value of 5.0.

Colour Checker
I used this in two images to cover the change in lighting and then totally messed it up by failing to read the instructions properly.

Checking 
I carried out the checks listed in my generic workflow (see previous blog). There are advantages in shooting at home because I could be confident that I had all necessary spares.

Shoot


Location - Home

Camera see above.
I thought I would use this shoot to try 'tethered' shooting i.e. with the camera attached directly to a laptop computer. This offers the opportunity of seeing each shot as a much larger image than is available on the LCD on camera. It worked well although there was a need to ensure that the laptop screen was at the correct angle for viewing otherwise the image appeared to be either too bright or too dark. It did however give me a great deal of information about the position of the lighting and the shadows cast on the subject.
Unfortunately I also had the camera tied to the flash unit so there was a tangle of wires that nearly ended in tragedy. If I was to pursue this type of photography in the future I would get a remote control for the flash unit.
In all I took 38 images over a period of about 1 hour.

"Back Home"


Download
There was two stages to the downloading. Images taken with the camera tethered to a computer are only stored on the computer. It was necessary therefore to download onto a memory stick and then upload onto the main computer. (I don't have Photoshop on my laptop.) For those taken with the camera untethered the download was direct to the main computer.
There is an automatic back up system on the Mac that saves to an external hard drive. For my purposes this is sufficient back up at this stage and I can see no reason for another back up system although I can appreciate why professional photographers feel this need.

As I mentioned in the paragraph about the colour checker I had failed to read the full instructions. You have to save the images containing the shot of the colour checker in DNG format. (There are other alternatives but the version I bought was for Photoshop rather than LightRoom). Annoyingly I used to follow the practice of saving all my images as DNG files but stopped shortly before I began this Course. Lesson learnt - always read the instructions and think carefully before abandoning a system that has worked successfully.

Check
Using Adobe Bridge I made an initial trawl through the resulting images deleting those with obvious problems such as over or under exposure or where the placement of the lighting was not of the best. I then went through a second time with my wife (who was the subject) and made a shortlist of 7 images that I intended to do further work on. I did not delete those that had not made the shortlist as some of them were good images but were perhaps of the same pose but different expression.

Identity
I renamed the chosen 7 and copied them to a separate folder.

Process
I did use the colour checker to set the White Balance in all the images. There were two sets - one with off camera flash and one using candles. I selected, separately, the two sets transferred them to Camera Raw and then used the colour checker chart to establish the White Balance. I then used 'synchronise' to apply this setting to all others taken with the same lighting. I then followed the steps outlined in my previous blog to achieve the desired result.
There was very little work necessary in Photoshop itself although I did apply a Gaussian Blur to soften all but the eyes and lips of the subject.

Selection
We finally decided on three images to show the results of this work:-


I did not find the workflow restrictive nor did I find that I had to change it in the light of experience. The reality is that in photography like many other actions certain things have to happen before something else happens. For example  you cannot process an image unless you have taken it first. Workflows become restrictive when they are over detailed and the photographer feels a compulsion to follow them to the letter. They should be guides that remind us of things we need to do but they should never get in the way of the creative process. I would guess that the best photographers follow the same broad path to achieve the results they want but are alive to the unforeseen opportunity that is the spark that ignites our interest.

For Exercise 2 I will be taking street shots of the local Christmas Fayre.  The equipment I take I will have to carry and the use of a tripod virtually impossible if not dangerous. Clearly I will have to make a number of decisions before I go and hope that I will be able to get the shot that will make the whole evening worthwhile. We'll see.


Thursday, 18 November 2010

Digital Photographic Practice - Exercise 1

I have to admit I am something of a cynic where workflows are concerned. I have seen them used on multi-million pound building projects where the paperwork constitutes a filing cabinet full of material that seems to have little relationship to what is happening on the ground. Time lines and critical path analysis look and sound wonderful but do you really have to be told that the walls have to be built before you can put the roof on.

In the simplest terms the photographic process can be defined as:

  • Decide what you want to do
  • Go and do it
  • Process the results
  • Publish
Having got that off my chest I have created the following  workflow.


Objective
Portrait shoot. One session
Output - to Blog
Location
Choose location - Outdoors - Indoors
Equipment
Lighting
Available Light
Off Camera Flash
Studio Lighting
Camera
Canon 5D Mk II
Lens 24 - 70mm and/or 70 - 300mm
Colour Checker
X-Rite ColorChecker Passport
Computer
Mac OSX Snow Leopard with automatic back-up on external hard drive (1tb space)
Check
If other than available light check flash and/or studio lighting are working correctly and batteries do not need replacing.
Camera battery fully charged. Fully charged spare battery available.
Memory Card has sufficient space for planned shoot. Additional memory cards available.
Lens clean. Lens hoods available. Auto/Manual focus working correctly.
Computer. Ample space on hard drive and memory back up. Calibration within time schedule
Software for transfer and processing of images functional.
Shoot
Location
Having chosen location check lighting levels and finalise decision on available light or use of photographic lighting.
Decide on initial position of subject and test camera angles and lighting on subject.
Camera
Set and/or check all camera settings based on information from test.
Shoot test shots and check results using display and histogram
Carry out shoot checking results.
Back Home
Download
Download Images from Camera to Computer
Check
Using Bridge check images discarding all those with obvious technical faults or other unaccepptable results
Trawl second time awarding rating using star system
Check and discard images that are rated low
Identify
Name, number or otherwise identify all ‘keeps’ and place in separate folder(s)
Process
Using Camera RAW process individual images:
Apply Camera Profile as established by Colour Checker
If necessary check White Balance. Use temperature slider to get desired result
Use ‘Exposure’ in Camera RAW to set desired result
Add Contrast if necessary
Add Clarity and Variance
Use Adjustment Brush for local adjustments
Apply any finishing effects deemed to be necessary
Transfer image to Photoshop and finalise processing.
Save images in separate folder
Selection
Re-visit all remaining images and make final selection either several for clients approval or, if you are the sole arbiter the number you require.
Saving 
Include necessary metadata into file 
Publish
Transfer in desired forrmat to destination

The next step is to take the portrait images and see whether it works.

Sunday, 14 November 2010

Final Assignment - The Art of Photography - Submission

I trawled through my own library of images seeking inspiration for this assignment. I came across a large number of images that I had taken on holiday whilst in France this September. Earlier in the year I had read a fictional book that used the pilgrims' journey from Le Puy en Velay in France to Santiago de Compostela in Spain as its factual basis.  Intrigued by this I decided to follow this path (albeit by car) in two stages - the first part in France in late 2010 and the Spanish part in early 2011. I had a vague idea of using the resulting set of images as a 'Travel' submission for my Associateship submission to the Royal Photographic Society. I had put this idea on the back burner when I decided to work for a Degree and improve my knowledge of photography. I had therefore filed the images as something I might return to in the future or as a simple reminder of a very enjoyable holiday.

On more careful reflection I realised that I had the makings of a submission for the final assignment. The journey met all the criteria of the assignment although there was a great deal of work to be done to select the images that best illustrated the story I wanted to tell. I had several attempts trying to create an interesting 'narrative'. My first one was very religious building orientated (architecture is a genre that I enjoy) and lacked variety. It was also difficult to conceptualise the images on a magazine page. I overcame this problem by creating a slide presentation using 'Keynote' on a Mac with each slide representing a page. I found this most useful.

Thought had to be given to how much narrative to include. There was a clear need to give some background information so that the images were seen in context but I felt that the important part was the reasoning behind my choice and why I had chosen the images that appeared in the final narrative.

My final choice was  a set of images that were varied, told different elements of the story but acted as a cohesive whole.

This assignment lay way outside anything that I had done before and therefore a considerable challenge. Although I had created a panel of images that had acted as a coherent whole the individual images had no direct connection one to the other. I await my tutors comments to see if I understood the purpose of the assignment. I have given myself plenty of time before assessment to submit a further effort.

Thursday, 11 November 2010

New Course - Digital Photographic Practice

Received the Course materials today. After a quick glance through I am looking forward to starting it as soon as possible.

Sent my profile (updated) to my new tutor so await his response.

Sunday, 7 November 2010

Final Assignment - The Art of Photography

Completed the first draft of this assignment.

Although I had a good series of linked images that met the criteria was uncertain as to how best present them. Current thinking is that I will produce a PDF document which will allow me to show how the photographs would be set out in a magazine article. However this creates smaller images the quality of which is hard to determine. Perhaps the answer is to send my tutor the usual batch of images via e-mail and support these with the PDF document.

Have to think about this so will allow the draft to 'simmer' for a while.

Tuesday, 2 November 2010

Rain


I took a number of 'rain' shots but chose this one because of graphic element. There was also the added attraction of the reflected autumn leaves. The image is deliberately over-sharpened to highlight the raindrops.

The difficulty in this exercise was to find an 'attractive' shot. Rain by itself is not really attractive and most scenes are only enhanced by rain if there are reflections in the pools or wet it creates on other surfaces or it creates a different type of image such as people coping with the rain or cars splashing through large puddles on the road.